Wednesday 31 August 2011

Printing with children

Yesterday was one of those days I had been saving this rainy day activity for.  The sky was grey, the wind was blowing and it was wet and generally gloomy.  To top it off, the temperature has made it feel more like winter than summer!

  At the beginning of the summer I had put a couple of polystyrene pizza trays to to one side as these are perfect for polystyrene prints.  You can also use polystyrene trays, just cuts the edges off to create a flat surface to work on.  You can buy sheets to do this on, but it makes sense to recycle packaging.

There is a four year gap between my children and I some times find it difficult finding activities they can both do for themselves at the same time. But this really is an excellent activity to do with people of all ages, and abilities as really simple marks can produce an excellent piece of work.

You will need:-
- a polystyrene sheet
- a pencil or ball point pen
- printing ink or thick poster paint with a little washing up liquid added to it
- a tray to put your ink/paint in
- paper
- a roller or paint brush

1.  I prolonged the activity by giving them paper first so that they could get an idea of the designs they would like to use but you can go straight to mark making on polystyrene if you wish.  The Little Fairy needed to be encouraged to keep her designs simple, she kept wanting to do little intricate designs, but simple designs work best for this.

2.  Make marks on you polystyrene sheet.  I found it useful giving mine blunt pencils to use as in the past I have had children actually going through the sheets due to them trying to leave pencil/pen marks.  It is simply a tool for creating an indentation. 


3.  Cover the sheet with an even layer of ink or paint, using a roller if possible.  If not, a large paint brush will do.


4.  Place a sheet of paper of the polystyrene sheet, being careful to keep it in the same position, and apply pressure.  A rolling pin can be used for this as it provides even pressure across the paper.

5.  Carefully peel back your paper to reveal your master piece!  If the image is very faint do it again on a clean sheet using a little more ink/paint.  The polystyrene can be used over and over again making it perfect for creating items such as cards and wrapping paper, paper table cloths etc.

Here are some I'd done with a group of school children earlier in the year.  Their topic was fruit and they created their prints from line drawings they had produced after studying different fruits cut in half.


Monday 29 August 2011

Shower cap or chefs hat?

There was me thinking I was making chic shower caps, when all along I was making chefs hats!!!  


Wednesday 24 August 2011

I Love Manchester Day - Friday 26th August 2011


I have just read over on seventyseventyone designs blog that The Craft Shop in The Royal Exchange Theatre, Manchester are supporting the I Love Manchester Day on Friday 26th August 2011.  
As part of this, they are going to be offering a 20% discount off all work by North West designers  starting Wednesday 31st August until Saturday 4th September (these dates have changed...sorry to those who read it previously!!!).  As I am based in the North West, my work will be included.  If you are in the area, pop into the Royal Exchange and look for the MCR logos which highlight the North West makers.

I Love Manchester is a campaign that has been created to show that Manchester is proud of it's city, and to unite against anti-social behaviour.  It celebrates Manchester and all the fantastic things about the city. You can join their Facebook campaign here.

Sunday 21 August 2011

Fruit Tea Loaf

Fruit Tea Loaf - very easy
This must be the easiest cake to make.  It takes 10mins to prep, and just over an hour to cook.  You can also put in what ever dried fruit you fancy.


125g butter
200ml milk
175g mixed dried fruit (I like using a cherry, berry and raisin mix)
175g caster sugar
225g plain flour
1/2tsp baking powder
1/2tsp bicabonate of soda
1 medium egg

1.  Pre-heat oven to 180C/350F/Gas 4.  Grease and line the base of a 2lb (900g) cake tin.
2.  Put butter, milk, fruit and sugar into a large pan and cook over a low heat until the butter has melted and the sugar has dissolved.  Put to one side to cool a little.
3.  Beat in the flour, baking powder, bicarbonate of soda and the egg, then pour into your tin.
4.  Place in the middle of the oven and bake for 1hr.  Look at the cake after 45mins and cover with foil if it is browning too quickly. Check the cake by putting a skewer in the centre of the cake.  If it is clear when it comes out the cake is ready.
5.  Remove from oven, and allow to cool in the tin before turning out.  You will need to run a sharp knife carefully around the edge of your tin before you do so.

This cake will keep up to a week (not in our house!!) if kept in an air tight.  Also freezes well - wrap in foil and freeze for up to 2 months.

You can find more delicious recipes here.

Saturday 20 August 2011

Chicken, potato and feta bake

This, alongside Roasted Butternut Squash Lasagne, is one of my favourite meals at the moment.  It doesn't look like much, but it is heaven on a plate, is oh so simple... and very very healthy!


Chicken, potato & feta  - serves 4

1 large onion roughly chopped
750g new potatoes 
olive oil
4 Chicken breasts – free range! – cut into pieces
200g cherry tomatoes
Chopped thyme or oregano, fresh or dried
150ml white wine
150ml vege stock
100g crumbled feta


1.   Preheat oven to 220°/. Slice small new potatoes in half, bigger ones into quarters, and par-boil for 10mins.
2.  Place onion & sliced potato in shallow roasting tin, drizzle with a little oil, season and toss to coat. Roast for 10 mins.
3.    Put a little oil into a frying pan and fry the chicken to brown on both sides.
4.  Chop the tomatoes in half and scatter over the potatoes with the herbs.  Return to the oven for 5 mins. 
5.  Take the potatoes out of the oven, lay the chicken on top and pour over the white wine & stock. Roast for a further 15 mins or until chicken is cooked & vegetables tender.
4)    Serve scattered with feta, a green salad, and lots of quality bread to mop up the fabulous juices out of the roasting dish.


Underneath this loveliness are the most delicious juices,
so plate up at the table and let people tuck in!
At this point I must thanks my little sister for making this for me and sharing her recipe!  Now it's your turn to experience, pop on your pinny and get making!

Really want to look the part?  How about one of these pinnys?  These, and others, are available to buy in my shop.


You can find a collection of lovely recipes here.


Thursday 18 August 2011

A Trip to Chester

Yesterday is was our wedding anniversary, and we decided to celebrate by spending a night away in a posh hotel (We hadn't had a night away by ourselves since we had children  and the Fairy is now 7!!).  We fancied a city not too far away from home so that there wasn't too much traveling involved, and decided on Chester, a city packed full of history.

After dropping our bags off at the Abode Hotel, we spent most of the day wandering around the walls of the city, dropping off them to experience the river Dee and the bustle of the shopping area, to admire the architecture from different periods, and to eat and drink.  

Unfortunately for me, we had been in a rush to get out of the hotel, to make the most of our time without the children, and had forgotten to put my camera in my bag ('typical' I hear my mum saying!).  

The Old Dee Bridge

Chester Cathedral 
If you are interested in buildings at all, Chester really is a place to visit.  Within the city walls, you will find the remains of Roman architecture, Medieval architecture including the Old Dee Bridge and Chester Cathedral.  There are also the stunning black and white Tudor Buildings which are so predominant. Include in these are The Rows, which look like Tudor Shopping Mall with shops at street level and steps leading to a gallery area where you find more shops.  There are also some beautiful examples of Georgian and Victorian architecture.  If you would like to look into the architecture more, there is some information here.

After many hours wandering, we headed back to the hotel to put our feet up (!!!) for half an hour before freshening up for the evening.

We started our evening on the terrace of the cocktail bar in the hotel with a Cosmopolitan.  Yum, although a little pricey!


And then headed off into town to eat at Duttons.  We were struggling to eat.  There are lots of very (very) posh restaurants in Chester, but to be honest, I don't go in for flash looking food at extortionate prices.  I like good quality, relaxed dining, that can be shared.  The food at Duttons was reasonably good, somewhere in the middle really.  After eating we stumbled upon The Living Room where we discovered a signature menu of cocktails at very reasonable prices, so simply had to sample some before making our way back to the hotel.

So, what did I think to Chester?  I loved it.  I loved just wandering and looking at the buildings, and soaking up the atmosphere... we were very lucky as the sun shined for us all day!  It was just a little too busy for me during the day.  I struggle with hustle and bustle, which is why I don't do much shopping (in saying that I did come home with a new dress and a top!).  I am also pleased that our anniversary was during the week as it was quiet eating in the evening.  I'm not sure I would have enjoyed it as much if we were fighting for space, and I get the impression that this would be the case at weekend, particularly when there are races on... I think the vibe would change considerably.  It's definitely worth a visit, just choose your time!  

Tuesday 16 August 2011

I have been a busy bee!!!

In between juggling looking after the children, making food, shopping for food, tidying, tidying again... and again, etc. etc. I have also been getting stock together for Christmas, and updating my shop.

You may have noticed on my shop widget at the right hand side that I have some new products.  I had a product shoot with Michael J Oakes, so I am now (slowly) listing them in my shop.  

There are some fabulous new fabrics...

...wash bags...
... cosmetic bags... 


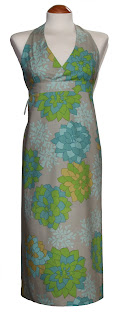
... halter neck pinnies

 ... shower caps...
... these are just a few things that have been listed, so please do pop over to my shop to have a closer look.

There are more products to come over the next week or so... and then I may have time to tell you about the clothkits doll that my daughter is in the process of making with my sewing machine!!!


The outcome of last weeks giveaway

Time just seems to be flying at the moment.  I can't believe it is over a week ago since my last post regarding my facebook wash bag giveaway.  Some of you may be aware how it turned out, but for those of you that don't, this was the outcome...

... I was over in Yorkshire stopping with my lovely little sister for a couple of days, so I had a couple of assistants to help me.  My sister wrote out the numbers on little pieces of paper and we decided that number 1 would be the first person after me (I was the first person to 'like' myself!!!), and we would go up the list.  My brother in law got out his hat and put the pieces of paper in his hat, my sister gave them a shake, ruffled them around, blew on them and asked her hubby to pull out her number.  Blowing on them for luck failed her, and he picked out the number 3.  We were very shocked when we looked down the list to find that it was actually my sister-in-law!!!  Well done Cheryl, and sorry to all those whose numbers were left in the hat.  

If you would still like one of these lovely bags... 

you can buy them in The Royal Exchange Gallery Craft Shop in Manchester, or in my online shop.

If you want to be kept up to date with future giveaways and offers, they will be posted on my Loula Belle At Home facebook page.  Just click on the 'like' button so that you don't miss them.


Sunday 7 August 2011

Would you like one of these bags?

I just love this fabric, it's like taking a walk in the woods.  Because there is so much going on in the fabric, each bag I make is different.  Fabulous.  Anyway, I thought that I would give one away to one of my facebook 'likers'.


All you need to do is hop over to my facebook page (or alternatively, click on the follow us on facebook link in the right hand side of this page), and click on the like button in the left hand margin, you are welcome to leave me a message if you wish, but you will automatically qualify for the bag that I have sitting here waiting for a new home, by simply 'liking' my page.  I will be picking the winner from a hat Sunday 14th August at 9pm, so you will need to get it done before then!

Good luck!

Saturday 6 August 2011

Saturday Scone Making

I have had an extremely busy week this week, juggling looking after the children with getting myself sorted for yesterdays photo shoot for my new products (more about once I have received some of the lovely images!).

Today I was feeling quite lazy, staying in my pyjamas until after 10am (the children didn't get dressed until just before lunch!), allowing the children to sit in front of the TV whilst I indulged myself in a  book and then a bath!

This afternoon, we got down to business...


...and made scones. 

  I had been planning to make scones for our lovely neighbours (who very kindly keep an eye on our house when we are away) since we came back from our holiday.  I thought that this would be a good choice as one of them has diabetes, and didn't want to make something they couldn't eat. Unfortunately I had made an abundance of cakes the week we came back, and I couldn't stomach any more baking!  Today I overcame it and we got out our pinnies (me and the children that is!), and were able to indulge in scones with jam and cream, whilst our neighbours were delighted to receive theirs with strawberries and clotted cream.

We made fruit scones, here is the basic recipe, with variations below.

Scones - makes 8

225g (8oz) self raising flour                                                   
pinch of salt                                                                            
5ml (1tsp) baking powder                                                      
40g (1 1/2 oz) butter
approx. 150ml (1/4 pt) warm milk*
milk to glaze

1.  Set over to 220°C/425°F/Gas Mark 7.
2.  Sift the flour, baking powder and salt into a bowl, and then gently rub in the butter until the mixture looks like fine bread crumbs.  Stir in enough milk to form a dough.
3.  Roll on a lightly floured work surface until approx. 2cm (3/4 inch) thick, and cut into rounds with a 6cm (2 1/2 inch) circular cutter.
4.  Place on a greased baking tray, brush with a little milk, and bake in the over for around 10 mins until golden brown. 

Fruit Scones - simply add 50g (2oz) of sultanas, currants, dates, cherries or what ever you fancy before you add the milk.

Cheese Scones - stir in 50g (2oz) of finely grated cheddar before adding the milk, and then sprinkle a little on top after brushing with the milk.

* my mum read somewhere that using warm milk helps the scones to rise, making them  
   really light.  It works, and is worth doing!


The little Tinker brushing on the milk glaze. 
It's always difficult cooking with both of them.  There seems to be tussles
over every job that needs doing.  Although the Fairy is bigger,
the little Tinker is very determined!!!

Freshly bake scones crying out for jam and cream!
Both the children, and the kitchen were covered in flour by the end, I'm just pleased I can throw our pinnies in the wash with the rest of the laundry!

I thought you may like to see my granny Kitty's recipe for scones, taken from a hand written recipe book she had compiled (more to come at a later date!)


So, how about a Sunday scone making day?  Pop on your pinny, or pop over to my shop if you haven't got one, and get baking!

You can find more delicious recipes here.