Saturday 24 December 2011

Happy Christmas everyone!

I just wanted to stop by and say a Happy Christmas to my followers, friends on facebook and fellow tweeters.  Wishing you a very Merry Christmas!

We are all set for Father Christmas.  For some reason Father Christmas had to have a straw in his wine (!?!) and the children made mince pies and a Christmas Tree biscuits for him.


Saturday 17 December 2011

How to make a paper box - tutorial


I have been making these little boxes for years.  They are perfect for filling with treats and giving as gifts throughout the year, but I always make them as Christmas gifts for teaching staff that work with my children.  I love making them, and I love making little treats to put inside them.  This year we made Nigella Lawson's 'Hokey Pokey', I actually remember it being called Cinder Toffee when I was a girl (oh deary me, I sound like my grannie!), but it is more commonly known as honeycomb, and can be found inside Crunchie bars.  Apparently the name 'Hokey Pokey' comes from Cornwall.  What a fab name, I love it, and  it gave me the opportunity to sing the Hokey Pokey (while my daughter pulled her face at me!!!) whilst making it.

Okay, here's how to make the boxes:

This makes a box measuring 10x10cm

Materials needed:
2 complementing pieces of 12x12” paper*
scalpel
glue (not essential)
ruler

1.   Place the piece of paper that is going to be the bottom of the box in front of you and take a 1cm strip off the top, and a 1cm strip off one of the sides (you should still have a square!), to make the bottom of your box slightly smaller.

2.  Take one of the corners and fold diagonally across to meet the opposite corner (fig 1). Crease, unfold and do the same with the other corners so that when you open it out again you have a cross (fig 2).


fig 1.
fig 2.
 3.  Now take each of the corners and fold into the centre point (fig 3).

fig 3.
 4.  Leaving the corners in the centre, fold the bottom edge up to the centre line, crease and then unfold (fig 4).  Do this with each of the edges.

fig 4.
 5.  Unfold you sheet (fig 5).

fig 5.
6. Fold two opposite sides into the middle, and using your scalpel and ruler, cut along the crease to the edge of the folded sides (fig 6).

fig. 6
 7.Okay, now you should have two opposite sides with long pieces, and two short sides.   Place the paper with one of the short sides towards you.  Pick up the long end on the left and the long end on the right and bring them together (fig 7).  Still holding the two pieces together, take the short end and fold it over the top so that the triangular end fits into the bottom of the box (fig 8).
fig 7.
fig 8.
 8. Turn your box around and do the same for the other side (fig 9).  You can at this point put a little spot of glue under each of the triangles in the bottom of the box to hold them in place.  It’s not necessary, but they often pop up if you don’t.

fig. 9
 9.Time to make your lid.  Follow steps 2-8.


10. Fill full of treats and wrap a pretty ribbon around for a perfect gift.

If you are putting food in them, I recommend that you put a piece of greaseproof paper in, big enough to come up the sides and fold over the top too.

The past few years I have made truffles, what would you put in yours?


Sunday 11 December 2011

Sparkly Sunday

I can't say I am a fan of sparkle, but I guess at Christmas time, you just have to make exceptions.  This morning, we got out the paper, scissors, glue and glitter to make snowflakes for our window.

Do you remember making these at school?  I haven't made any since then, but thought it would be a simple activity for this morning.  We had great fun, and ended up with little bits of paper all over the floor.  Luckily the little Tinker still finds hoovering a novelty!!! 


Glitter was essential, and the little Tinker got really involved in this!


I know the picture is rubbish, but you get the idea.  They are very pretty.


Last year we made these birds for the window, and these were the snowflakes we made, I fancy making some more.  What have you been making, or will be making?

Wednesday 7 December 2011

A Little Self Indulgence

I have been neglecting blogging recently.  Things have been so busy here, and both myself and the little Tinker have been suffering from horrible colds (with hacking coughs), and therefore sleepness nights and fuzzy heads!  I have also had so much to share, I've not known where to start... resulting in Emu syndrome!  Anyway, my head is out of the sand, and I've decided not to dwell on what I have done and what I have wanted to write about, and start afresh from yesterday.

As I have said, things have been very busy.  I have been doing lots of making ready for my stockists, and for the events that I have been selling at.  All this is done now, I had my last party (before Christmas) on Monday evening (another successful event), and thought I deserved to do something for myself.

So, after the children had gone to bed last night, I came into my room, and instead of getting my machine out, I picked up a piece of paper and started doodling...


... and then out came my scalpel...


... and a few hours later I had this!

I just love paper cutting!  

Tuesday 29 November 2011

Working in Pairs

I appear to have been working in pairs the past week.  It has been quite relaxing doing so, and has meant that I have seen the finished product much quicker.  Very satisfying. The past few months I have needed to make quickly and have had too many things on the go, making it too much of a production line to make it too satisfying.  

Last weekend, I took a little step back and decided that I would leisurely complete a few cushions ready for a couple of events I have in the next week.  I loved these cushions when I made one for my niece (she is still taking hers to bed with her!), they are so cute, and the plan was/still is to make some in the New Year, but I couldn't resist.  These won't be available in my shop until 2012, but I do have a couple that will be available to buy at the Contemporary Arts and Craft Fair, Astley Park, Chorley, on Sunday 4th December, and I am also happy to take orders.


Today's mission was a new design bag. I had previously decided that I would like to use my pear design on a wash bag. I'd intended to do this for a while, but hadn't had the opportunity, so I seized the moment and took advantage of my quiet house (everyone was out, lovely!) to make a pair of pear bags.  I had intended just to use one pear, off centre, but I liked the three of them together.  I'm wondering though whether I should have used contrasting thread on the pears, and make the stitching more of a feature.  What do you think?


Saturday 26 November 2011

This years Christmas cards

Last Sunday I spent the afternoon with the children creating our Christmas cards for this year.  We decided that we would do some more printing (see previous printing post to find out how) as both of them love this activity and I knew that both of their designs would look great.

The Fairy practised some snow flake designs and I tried to encourage the Tinker to do some lines that went through each other to create a snowflake... this didn't quite do to plan.  He likes wild lines and dots!  I ended up helping him create a couple of snowflakes on his, to make is look a little Christmassy before he got to work with his dots!  Then we covered up and got to work!


Peeling the paper off the polystyrene is the Tinkers
favourite bit.  He loves to reveal his image!

We had a real little production line going... the table was covered!
I managed to finish them off this week by sticking them to card (in between tending to a poorly little Tinker.)

Our finished cards look like this...

by the little Tinker (age 3)

by the Fairy (age 7)
 I love making Christmas cards, especially if the children are involved.


Sunday 20 November 2011

A Super Duper Trip out to Blackpool

Yesterday I headed off (at some ungodly hour) with lots of my lovely products and my little helper, to the Winter Gardens, Blackpool for the Super Duper Fair.

I find fairs quite hard work, lots of mad dashing to get everything on your stall in time, lots of standing around... waiting... and then a mad dash to pack down, rush home and see my children (and have a glass, or two, of wine!)

The frantic hustle and bustle as people set up.
And here we are.  Set up and ready to go, with my little helper trying to hide!!
 Although it was a long day, with lots of standing around (I like to be at eye level when talking to customers, but don't like to spring out of the background when they arrive, so find myself stood for most of the day!), it was pretty good.  There were lots of visitors... but that could be due to the fact Engelbert Humperdinck was playing at the Winter Gardens that evening (do you remember him?!!!), and thankfully some of them were out doing their Christmas shopping!

It was also lovely to catch up with some faces I hadn't seen for a while, including the lovely Linda from The Glass Boutique (you can also find her on facebook), and Margaret, from Soapure who makes the most delicious soaps (also on facebook).

I also had the pleasure of meeting some fabulous textile designers Charlotte from Strange Bird Designs and Coo&Co.  I am looking forward to following their developments, and having the opportunity to look more closely at their work, it's fab.


Wednesday 16 November 2011

Encouraging children to make!!!

As you may well know, I feel it is really important to encourage children to make and create, and so have been working on various kits to support this.  

'These kits have been designed to provide children with the opportunity to experience new activities, develop skills, and build self-confidence that will last a lifetime.  They also offer the perfect opportunity to spend time with your child, doing something together and creating lasting memories for you both.'


Because my main passions are sewing and cooking I used this as a starting point.  

Soooo, now available to buy are...

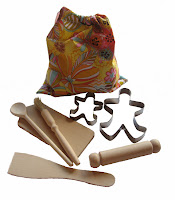
... The Budding Chef's Cooking Set...

This kit is available for boys and girls..

... you can even have it customized.


We tested the kits when I took a set each for my niece and nephew last time we visited.  They loved them, and kept getting their utensils out to look at, and then putting them away again.  My niece was really sweet, carrying hers around with her... she even came down for breakfast the following morning with it clutched to her!!

They enjoyed making the gingerbread people even more.  First they explored the dough...


... and then it was down to business!!!


This cooking set compliments the Little Beau Utility Pinny Set and the Little Belle Utility Pinny Set.


Also available in the new make and do range are some little brooch kits, containing everything you need to make yourself a brooch. Fabulous little gifts that fit perfectly into a Christmas stocking!

You can make a Christmas pudding...


... or if you are not too keen on Christmas pudding, you could make a Fairy cake.


So if you are looking for a pressie to encourage a little on you know to have a go and do something creative, head over to my shop for a closer look!


Monday 14 November 2011

A quick step back in time!

Oh, I am so conscious of time slipping from me at the moment.  Today I picked up a pack of yoghurts from the supermarket and the best before date is my birthday... shock, I am nearly another year older, Christmas is nearly here, and there is so much to do and think about before then!!!

Yesterday I finally uploaded some photos from last weeks bonfire, so I thought that I would take a step back in time rather than rushing ahead of myself and creating a whirlwind around me.

We had a lovely bonfire weekend, spending lots of time with the children and doing lots of activities with them.  The bonfire we had was at my mum and dad's, and was a very small affair.  I'm not really a fan of big bonfires, they don't quite create the same ambience the bonfires of old created (although I'm sure less accidents occur)... oh, how old do I sound?!!!  

Bonfires in the village I grew up in were a  real community affair, a party really, where everyone came together to create a fantastic evening.  Wood was collected by the children (and big children), and bonfires were fiercely guarded!!!  Hotpot, parched peas, parkin and treacle toffee was available in abundance, and eaten until we felt sick.

I wanted to try and recreate this experience for my children (albeit on a smaller scale) so we made...

... a Guy Fawkes using clothes that weren't even fit for recycling...


The Fairy gave him a sad face as he was going
to be killed!  Quite sinister eh?!
... made Parkin (I won't be sharing the recipe.  It was the first time I'd made it, and I wasn't happy with the recipe I used... not a patch on Granny Kitty's but I didn't have time to decipher her recipe(s), so need to work on it!), and Grandad Tom's treacle toffee (Grandad Tom was Kitty's husband!).


For tea, I made a cheesy vegetable hotpot with a suet crust (I have just discovered I love suet pastry, it gives a fabulous chewy texture, and is so easy to make... we're having dumplings in tomorrow nights tea!!!), and then we made our way up to the allotment (where the children had been helping grandad with the bonfire while I made pie) armed with the parkin, treacle toffee and a flask of Vin Chaud (mulled wine).

The fire was small, but perfectly formed!!!


We had great fun 'bigging up' tiddley little fireworks.

And Guy Fawkes got what he deserved (?!!)

The Fairy wasn't sure what to think when he caught alight, and the
Little Tinker kept informing me his trousers were on fire!

A perfect Bonfire experience for the children (and us!).  I loved it.


Grandad Tom's Treacle Toffee


Please be very careful when making treacle toffee, the sugar gets very very hot, and can cause horrible burns!

115g (4oz) butter
230g (8oz) granulated sugar
3tbsp treacle
2tbsp vinegar

1.  Grease and line a swiss roll tin, and then grease the lining paper. 
2.  Melt the butter in a large pan, then add the remaining ingredients.
3.  Stir over a low heat until all the sugar has dissolved.
4.  Bring to the boil and boil for 10 minutes, taking care not to let it burn.
5.  Ball test in cold water ( pour a little into a bowl of cold water, if it starts to set and is chewy when you take it out it is ready), when ready pour into your tin, leave to cool and mark out pieces with a greased knife before allowing to set completely.

Monday 7 November 2011

Fabulous Frost

I love mornings like this, and today I was lucky enough to have the opportunity to have a stroll into the park with the Tinker where we found some beautiful frost.


Saturday 5 November 2011

Oh, how time has flown!!!

I cannot believe that it has been over two weeks since I last wrote a blog post.  I had a very family orientated half-term as I was away for much of it visiting my sister and her family, and then my brother and his family, and then fell ill.  Because of this I have had lots to catch up with and unfortunately both blogging and ironing have been at the bottom of the list (I have 3 huge piles of ironing and hardly any clothes in drawers!!!).

We were lucky with the weather over half-term, and managed to spend quite a bit of time in the fresh air, listening to the waterfall ...


... looking at fungi...


... and fabulous roots in Hoghton Bottoms.


And then using leaves as butterfly wings...


... playing (and eating lemon drizzle cake) in these fantastic woodland houses...


... and exploring the beautiful colours around us...


... before finally finding a spot to bask in the Oundle sunshine!!!


We also tested out the new Loula Belle At Home baking sets that I have been producing, but more on that later!!!